The more camps you set up, the greater the demands for support, supplies and staff. Be realistic about how many campas are set up, and discuss the best strategic approach for the campaign as a whole.
Kitchens should be covered and food preparation areas raised well off the ground out of reach of dogs. Kitchens must be kept hygienic; it is a good idea to boil up all utensils several times a week, to reduce bug biomass! Store food in old filing cabinets or strong metal boxes to prevent rodents eating the lot. Store clean, dry bedding and spare clothes somewhere off the ground, covered and dry. Make sure you have a comprehensive first aid kit and a small fire extinguisher, and that everyone knows where they are.
Sleeping space positioned away from the core of the camp will assist peaceful sleep. Warm communal benders with clean bedding, and perhaps separate areas for men and women, are essential if you expect people to stay. Benders are cheap, low impact, semi-permanent dwellings. They are made by bending long coppiced hazel poles and tying them together to form a dome or cylinder. Then pull a tarpaulin or plastic sheet over the top. A bender with bed raised from the floor on pallets and a small wood burner can make a comfy and warm home.
Firewood should always be dead and preferably seasoned for about two years. Elder releases poisonous fumes when burnt. Dead wood in woodlands is full of insects, fungi, mosses and loads of other creatures and is ecologically rich. Always leave rotten wood and some vertically standing dead wood. To avoid damaging the woodland around the camp, ask for donations of untreated firewood (i.e. not painted or varnished).
When you've set up your camp, build a post-box near a road, send the camp a letter, and inform the post office in writing that you are there. Use the postcode of the nearest house. A letter to the camp may come in useful in court when fighting eviction orders. The camp should have air horns and whistles to use as an emergency signal if attacked.
Living communally outside can be wonderful or a nightmare; for ideas on how to make a camp run smoothly, see page "living communally" in Ch. 14.
If you have a straight trunked tree and there are no branches within catapult range, you could consider tape climbing. This involves using two 8 foot in circumferance flat tape climbing slings, looped around the tree trunk with a lark's foot knot. Attach the top loop to your harness and use the bottom one to step into. Move upwards, as if the tree were the rope when prussiking.
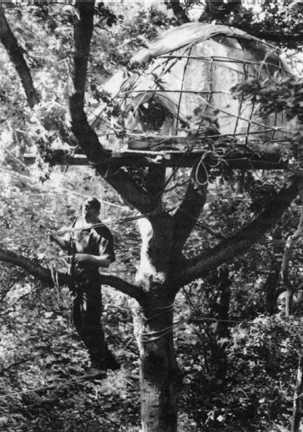
At Newbury in 1995, one camp built its communal kitchen and sleeping space in the trees. This got everyone up the trees and provided a media focus.
There are two main materials used in Britain: polypropylene rope and steel cable. Polyprop is cheap, easy to obtain and use, and a nice shade of blue. It is easy to cut. Steel cable is harder to get hold of and use - instead of using relatively simple knots, you will need U-bolts, nuts and a tensioning device. To cut the cable a hacksaw or bolt croppers are needed. It tends to whiplash if cut under tension. Steel cable allows longer and tighter walkways and speedier movement. A good combination is steel for access walkways and possibly "main arteries" within the camp, with polyprop elsewhere.
 Walkway Seats
These should be very effective on cherry-picker proof sites. Start by building
two walkways with two parallel top lines, the tree trunk's width apart.
In the eviction you can balance a wooden seat across the top two lines and sit on it. If the climbers interfere with the top two lines, you will fall off.
 Ladders and Poles
A ladder or a single pole can be placed to protrude above the tree canopy.
This will cause problems for climbers and may even put you out of reach of
cherry-pickers. This works best with straight-trunked trees such as
conifers.
Haul the pole or ladder up the tree and fix it to the highest part of the tree that you think will be safe. If using a single pole, attaching several scaffolding clips to its base will give you something to lash to.
Use a plank and a rope to establish a seat at the top. Use at least four 6 inch nails, bent into an 'S' shape, as hooks to hang your seat from the end of the scaffold pole. You can lock onto a ladder.
Eviction Access Points When building, plan for where the security cordon is likely to be during the eviction and have several hidden access routes outside it. For instance, you could have two lengths of fishing line running between two trees, one tree within the camp, the other outside of where any cordon might be. Both fishing lines are attached, at their camp end, to a long length of polyprop, the other end of which is already tied to a tree within the camp. The two lengths of rope should be tied, some 1.5m (vertically) apart. The length of rope will be less obvious if stored coiled, perhaps in a plastic bag. During the eviction, activists can climb the tree outside the cordon and pull the (invisible) fishing line until they reach the lengths of polyprop. By tying these off and tensioning them to their tree, they can form walkways to get across into the camp.
 Climber-Proof Platforms
These are designed with a platform surrounding the trunk of the tree. The only
access is a lockable trap-door. The tree needs to be the tallest tree possible
to prevent climber access from other nearby trees. If there are no branches
immediately below the platform, climber access becomes even more
difficult.
However, these platforms are vulnerable to cherry-pickers. Scaffold poles sticking out from the platform would hinder cherry-picker access; grease them to prevent climbers using them.
Incorporate lock-ons into all defensive structures (see "lock-ons" in Ch 12). Well-placed lock-ons can block machine access and prevent tree felling. The physical obstacles you create need an aspect of novelty and humour to help to lighten the atmosphere.
Suspended Platform Cable Lock-Ons
This involves locking onto the thing which is supporting you so you can't be
cut free without falling. It consists of a lock-on on a platform suspended by
steel cable from a number of trees. To build, pass a long length of steel
cable around the back of two groups of trees, crossing it over to form a
figure-of-eight, and tension it off tightly enough to support the platform and
lock-on. Protect the trees with carpet. The cable is not attached to the trees
and is held up by the tension and by the branches it passes over. Have the
cable make contact with as few trees as possible.
Build walkways (to be cut before the eviction) to give you good access for working on the platform and the cross formed by the figure of eight. Lash a long and sturdy wooden cross, on which to build your platform later, to the cable cross. Form another figure-of-eight around different trees or round the same trees in a different way. Tension this one off too.
The basic principle is to lock-on, via an arm tube to or near the cable cross. The lock-on can be as well protected as you want it to be. The key to the success of this platform lies in its construction, which prevents bailiffs getting good enough access to it to work on the lock-on. For stability, to reduce their access by cherry-picker, and to confuse them, build more figure-of-eight loops and pass them through the lock-on as well.
In the past, bailiffs have built a scaffolding tower up to the platform. Building the platform as high as possible, or over water, would make this more difficult. Prepare for a long stay.
Consider first whether to barricade the whole house, just the upstairs (removing the staircase, blocking off the stairwell and using an upstairs window as the only access), or just one "strong room". Decide according to the amount of people, time and materials available. Barricades can be done on a very low budget using materials collected from skips or disused yards in the area. They need to be solid and able to resist sledge hammer blows.
You will need: Tools - Hammers, saws, shovels, buckets, a crowbar, sledgehammer and screwdriver. Materials - Nails, screws and fencing staples; timber, old bed frames, wire, tin fencing and wire mesh (often used on building sites, can be borrowed, perhaps), doors, anything heavy or that could be filled with rubble, water or earth (e.g. oil drums); car tyres, mirrors, anything else you like! For concrete, mix sandy gravel and cement in a 3:1 ratio.
Handy Tips
To make a barricade, alternating layers of planks or doors and metal nailed into the doors or window frames make a good start point. Next, nail vertical beams behind these with a support prop to the floor at 45 degrees. Reinforce the base of the prop with another beam nailed behind it into the floor joists. Then fill the whole area with rubble, car tyres and other debris.
Stairwells can be sealed off using long planks, with water or rubble-filled oil drums on top. Removing the staircase as well makes access to the first floor even more difficult. It is vital to leave clear warning messages that any attempt to cut through the planks will result in a serious headache!
Entrance points must be kept shut at night and should be quick and easy to secure. Reinforce wall cavities with concrete. Floors should be reinforced or strewn with rubble to make entry into barricaded rooms from below harder. Consider digging into the floor or basement, building a wooden box bunker and then filling the remaining space with rubble and tyres. Have a good access tunnel with lockable gates. These have been used on Claremont Road and at the Darwen squats during the M11 and M65 campaigns in 1994
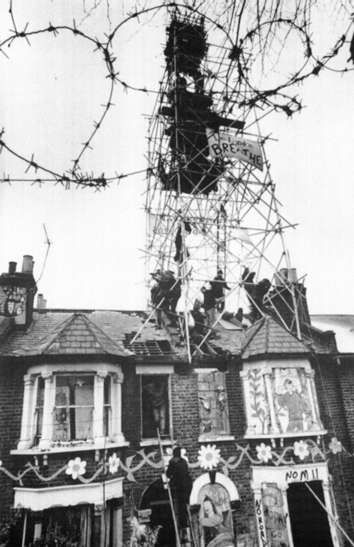
These blocking tactics push the focus for their assault onto the roof, forcing use of expensive cherry-pickers. Attic spaces should be occupied, filled and reinforced from both inside and outside if possible. Chimney stacks are ideal fixtures for lock-ons, although for safety they should be demolished to the level of the roof tiles. Heavy chains cemented into the building make a good connector for catching cherry-pickers (see chapter 12). Scaffolding or wooden towers emerging from the roof are a bonus, as are nets between houses and from trees to houses. Nets, as with tree defence, help movement around the threatened area if ground level is sealed off.
Build them narrow, curved and long; the more off-shoots, and changes of direction and gradient, the better. Round tunnels are more difficult for them to shore. Ideally, the tunnel system should start with a rounded shaft. It can be deepened by making further vertical shafts. If you like being a worm, make them thin, as bailiffs are fatter than us! Tunnels can lead to underground chambers, and concrete or steel bunkers. Never build tunnels on top of one another in parallel; where they come close together ensure they are at right angles.
Every lock-on and living space must have its own air supply directly to the surface. In shallow tunnels a hard plastic pipe will suffice, and should survive any collapse. In deeper tunnels, hard pipes can be used in conjunction with a 12 volt computer fan, powered by a car battery, to draw air down. Lay all pipes along the floor of tunnels where they are most likely to survive a collapse. If you always carry a knife, you can cut into the pipe at any point to get air in the event of a collapse. Mark all air vents on the surface with brightly coloured tape and make sure they are kept clear.
Don't take cooking gas, candles or lighters (liquid gas expands massively, displacing oxygen) down the tunnel. Burning things uses up valuable oxygen, may create deadly carbon monoxide... and it's hard to escape from fires underground.
Fill tunnels with as many trap-doors and gates as possible, especially near lock-ons. These caused lengthy delays during the A30 eviction at Fairmile in February 1997. The front door is the most important. It must be easy to shut in a hurry from the inside, and hard to open from the outside. Make the outside of the door difficult to grip, perhaps by attaching barbed wire to it, so that surprise attackers can't stop you from shutting it. This door should be shut every night when you go to sleep. Internal doors should be strong and heavy; they only need to be shut during the eviction. The hinges should be out of reach on the inside, and be massively reinforced. Doors can be reinforced with steel plate, manhole covers or similar, ideally on both sides. Hollow doors filled with concrete are particularly good, and are easy to make, as the concrete can be poured and left to set down the tunnel. Doors integrated into the shoring will be difficult to dismantle safely.
Each occupant should create a comfortable space for their bed, and somewhere to store food and water. Keep this clean with food stored in metal boxes, otherwise rats will move in. Have lots of extra empty bottles for peeing in, and plastic bags for crapping in. Don't forget toilet roll, and ash to cover smelly business. Prepare ways of dealing with boredom and isolation. The best lighting system seems to be a car battery powering a few small bulbs - for instance white fairy lights or car dashboard lamps.
Position lock-ons strategically (for how to build a lock-on see page yyy). For example, dig an alcove in the side wall of your living space, just big enough for you and your lock-on. This will minimise bailiffs' working space. Parts of the lock-on can be incorporated into the shoring of the tunnel. A thick metal plate, surrounding the arm hole, has proved very effective for this. Another good technique is to place your lock-on directly below a reinforced trap-door in a vertical shaft. Bailiffs won't be able to smash the door without endangering the person underneath. If you link the trap-door to the shoring below, then they won't be able to lift it either. They will probably dig around the door sinking a separate shaft to get you out. You could make this harder by reinforcing the shoring around the lock-on.
Set up a communication system linking each lock-on and the outside world. Baby-Parent Intercom units are ideal. To link several, simply join their wires at a junction box. Always conceal or bury wires to prevent them being cut. Surface links should be kept hidden until the eviction.
While digging the system, try to limit the number of people who see what you are doing. Only show trusted campaigners the tunnels, not every newcomer on site. Don't show journalists or photographers.
Tunnels created solely for access in and out of the threatened area can be speedily made by digging a trench, placing top and tailed oil drums in the bottom, to form a long cylinder and then covering it up. These were used to good effect for access during the Claremont Road eviction in December 1994.
A simple trench can achieve a lot. Dig it as wide as possible, and about as deep as wide. Wheeled vehicles will be stopped, but tracked vehicles will bridge all but the widest trench. The spoil can be used to build a bank, but move it well behind the trench, or bulldozers will just use it to fill it in again!
Barricades can be made with anything - logs, scaffold poles, metal sheets, masonry, barrels and old cars for example. Metal poles pointing outwards at an angle of 45 degrees will mean that only bulldozers will risk pushing against the structure. Intertwine everything so it holds together, using rope or wire. Burying or concreting the foundations into the ground will massively increase the strength of the barricade.
"Tank-traps" were used to great effect in the defence of Claremont Road from eviction in December 1994. Make one by clipping and welding together three or more scaffold poles into a 3-dimensional star, and concreting the structure almost half way into the ground.
Some road protest camps in Britain have declared independence, and planted up gardens on threatened land. These provide a proportion of activists' diet and a focus of activity for supporters. The Gotan Diggers Community at Newbury in 1996 was inspired by the 17th Century Diggers, who believed that "the land should be a common treasury for all".
The principles of Permaculture Design are a positive recent development well worth incorporating into camps (and our lives in general). Compost toilets, biodegradable dwellings and low maintenance perennial gardens are all ways of working with nature to enhance the living environment (see Appendix and Chapter xx).
During long periods of eviction, actions to prevent their key players (e.g. the undersheriff and specialist climbers) from arriving are well worth considering. Observation of known meeting points, tailing of plant, climbers and tree surgeons each day could provide valuable information. People not at the site of the eviction could do simultaneous solidarity actions, such as occupying the roof of the undersheriff's house, and picketing the bailiffs' hotel all night.
Work out who is going to defend what and make sure that all the defences are occupied. Positioning during evictions is key. Rather than scattering, support each other and work in teams.
Your personal manner may determine how you are treated. Relating to bailiffs is difficult. The nature of their job is despicable. Protesters have dealt with them in different ways, ranging from hostile contempt to friendly conscience challenging (if you can find their conscience). The more friendly your demeanour, the better you are likely to be treated.
Locking on in pairs with some sort of sound recording equipment can be wise. Look out for one another and record relevant incidents. Record as much as you can, on film (see page yyy), and paper.
Go for climbers as they come up. Look for pinch points, (e.g. forks in trees, defendable platforms) and hold them off there for as long as possible. Push their hands away and prevent them from throwing ropes higher up the tree. Place your feet on their shoulders and state that you will push down if they push up. Stay mobile, and flee if they are about to capture you. Aim to end up at your most defendable spot (i.e. lock-on, monopole etc).
It is essential to occupy walkways to stop them from being cut. You will also be defending two trees at once. If you clip onto the top line, they are likely to cut the bottom one leaving you hanging. The climber may then come for you on a pulley. If you can't escape, tie a prussik loop to the walkway so they have problems pulling you away. If you aren't clipped on, they hopefully won't cut the ropes but just chase you along the walkway. If they catch you, they will either attach a lanyard to your harness (so wear it under your clothing), or around your body and lower you to the ground. Alternatively, they may try to grab you from a cherry-picker.
Many protesters carry knives when living out doors: for cutting rope, carving wood or chopping vegetables. On a few occasions at Newbury in 1996, when protesters used them during evictions to cut ropes being tied around them, the courts misinterpreted this as cutting bailiffs' safety ropes. This led to several people getting unusually harsh sentences - prison - for Obstructing a Sheriff. The knives were visible in police video evidence.
 The most effective walkway defence technique we know of is also
the most dangerous. It should be practised at ground level. It involves lying
on top of a single rope, facing the climbers and unclipping your safety line.
When they get close to you, let go of the rope and put your hands behind your
back. This requires good balance.
The most effective walkway defence technique we know of is also
the most dangerous. It should be practised at ground level. It involves lying
on top of a single rope, facing the climbers and unclipping your safety line.
When they get close to you, let go of the rope and put your hands behind your
back. This requires good balance.
Any approach they make will seriously endanger your life. Make this extremely clear to them. If you consider this tactic, pad your chest, stomach and groin, as it hurts! If they have cherry-pickers, they will just pull you into the bucket.
The eviction of the Kennet camp at Newbury in March 1996 was preceded by a visit from a hit squad of climbers dressed in black and wearing balaclavas. They cut walkways and climbing ropes and, when spotted, fired catapults at people in tree houses.
When the bailiffs come, expect them to know exactly where the entrance is, and to go straight for it. To map out the tunnel system and find where you are, they may use heat-seeking equipment and radar. To confuse them, consider burying human-sized bags of silage (which rots without using oxygen, producing heat).
They have used unidentified tunnelling specialists who enlarge your tunnel and shore it up, gradually working their way towards you. They will not evict you themselves, but clear the way for the bailiffs. These tunnellers have been generally friendly and try to talk people out.
The police and bailiffs will probably cut your communication systems and replace them with their own, so that they can control information in and out. They can then use this to put psychological pressure on you to leave voluntarily, by telling all manner of lies - for instance, saying that everyone else has already left, or that other parts of the tunnel are collapsing. If you're down there a long time, they may approach your family to extract personal information, or to ask them to help persuade you to leave.
The only fully-contested tunnel evictions in Britain so far were on the route of the A30 in Devon in January / February 1996. The two evictions were very different in character; the methods used would appear to be largely dictated by media presence.
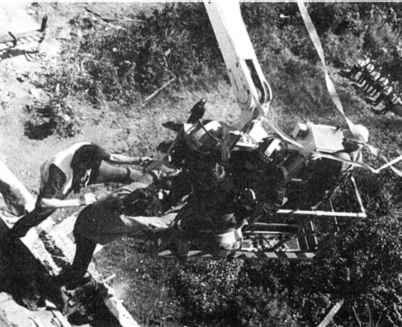
The first was at the Trollheim camp, where media and observers were excluded. Machinery was brought in to the edge of the camp at 3.30 am. The vibrations caused some cave-ins and shoring subsidence. Food and water supplies were removed, and ventilation pipes cut. Fortunately, a tunnelling expert ordered that the tunnels be ventilated and shored up to prevent a fatality. Protestors were treated roughly by bailiffs. For instance, one man, locked on by his wrist, had his ankles tied up with a rope which was then pulled by three bailiffs from the surface. They then left him stretched out, unable to move, on a taut rope for half an hour.
The second eviction, at Fairmile camp, started several weeks later, at about 10.00 pm. By the next morning, there was a huge media presence. The tunnel eviction was a gradual affair, with laborious removal of doors, digging the tunnel wider and strengthening the shoring. Protestors were treated more gently, and were able to issue demands.
Bear in mind that a lot of the tactics above will only be viable whilst they don't want to kill us. To readers outside Britain, where rubber bullets, water cannons and guns are routinely used to suppress protest, these tactics may seem naive.
Road Alert!
EMAIL: info@roadalert.org.uk